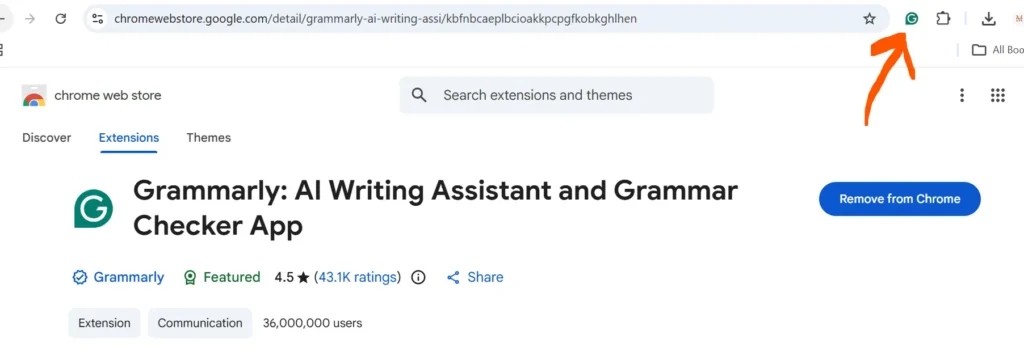
To add the Grammarly extension to Chrome: open the Chrome Web Store, search for “Grammarly: AI Writing Assistant and Grammar Checker”, click Add to Chrome, confirm by clicking Add Extension, then sign in or create a free Grammarly account. The extension icon (a green “G”) will appear in your Chrome toolbar, and Grammarly will start checking your spelling, grammar, and tone automatically as you type on any website.
Grammarly is one of the most popular AI writing assistants used by students, bloggers, and professionals. The Grammarly extension for Google Chrome brings real-time grammar, spelling, clarity, and tone suggestions to almost every website you type on — Gmail, Google Docs, LinkedIn, WordPress, Twitter/X, and more.
If you’re just getting into content creation, Grammarly is usually one of the first tools bloggers install — right alongside the basics covered in our guide on how to start a blog in India.
If you’re trying to figure out how to add Grammarly to Chrome, this guide walks you through the entire process — from downloading the Grammarly add-on for Chrome to signing in, enabling it on specific sites, and fixing the extension when it stops working.
What Is the Grammarly Chrome Extension?
Also Known as the Grammarly Add-on for Chrome
The Grammarly add-on for Chrome (also called the Grammarly extension or Grammarly browser extension — all three terms mean the same free tool) plugs directly into Google Chrome and checks your writing in real time, wherever you type online. Once installed, it automatically scans your text for:
- Spelling and grammar mistakes
- Punctuation errors
- Sentence clarity and readability issues
- Tone (formal, friendly, confident, etc.)
- Conciseness and word choice
- Plagiarism (with citation support)
If you write content for SEO purposes, Grammarly is usually just one part of a bigger toolkit — most writers also keep an eye on on-page basics like how to check dofollow and nofollow links before publishing.
Unlike a standalone app, the Grammarly add-on for Chrome works inside your browser — so you don’t need to copy-paste text into a separate tool. It shows a small floating icon in text boxes; clicking it opens suggestions you can accept with a single click.
Grammarly Chrome Extension: Free vs Premium Features
| Feature | Free Plan | Premium Plan |
| Spelling & basic grammar checks | ✅ | ✅ |
| Punctuation corrections | ✅ | ✅ |
| Tone detection | ✅ | ✅ |
| Advanced clarity & fluency suggestions | ❌ | ✅ |
| Vocabulary enhancement | ❌ | ✅ |
| Plagiarism checker | ❌ | ✅ |
| Full-sentence rewrites | ❌ | ✅ |
| Grammarly Go (AI drafting/rewriting) | Limited | ✅ |
For most casual users, the free Grammarly extension for Chrome is enough. Writers, students, and professionals who need advanced clarity checks and plagiarism detection usually upgrade to Premium.
How to Add Grammarly Extension to Chrome (Step-by-Step)
Here’s exactly how to add the Grammarly extension in Chrome, whether you’re on Windows, Mac, or Chromebook.
Step 1: Open Google Chrome
Launch the Chrome browser on your computer. Make sure it’s updated to the latest version — Grammarly works best on current browser versions.
Step 2: Go to the Chrome Web Store
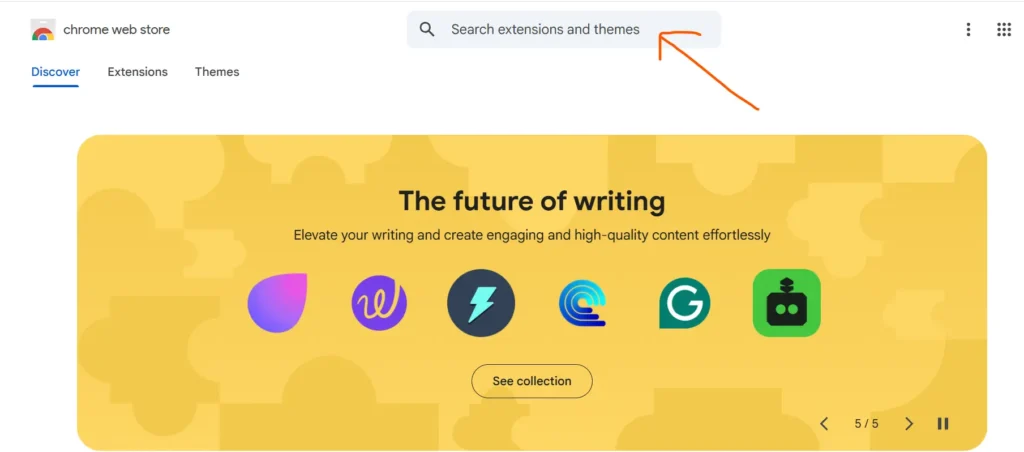
Visit the Chrome Web Store and search for “Grammarly: AI Writing Assistant and Grammar Checker.” You can also go directly through grammarly.com and click “Add to Chrome,” which redirects you to the same listing.
Step 3: Click “Add to Chrome”
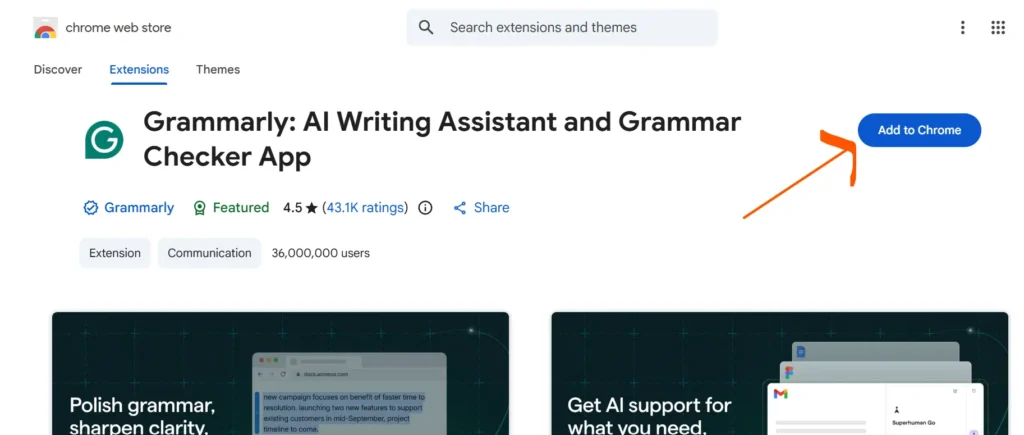
On the extension’s Chrome Web Store page, click the blue Add to Chrome button.
Step 4: Confirm the Installation
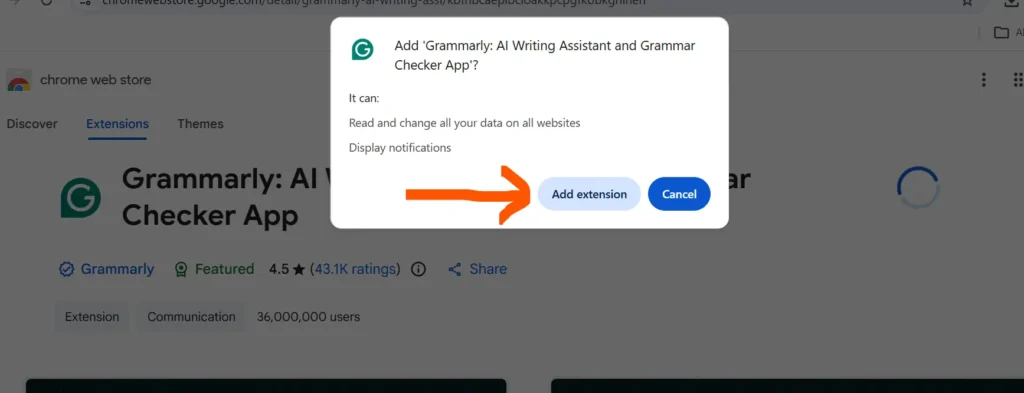
A pop-up will appear asking for permission to install the extension. Click Add Extension to confirm.
Step 5: Wait for Installation
Chrome will download and install the extension within a few seconds. You’ll see a brief confirmation message once it’s done.
Step 6: Find the Grammarly Icon
Look at the top-right corner of your Chrome browser. You should see the green Grammarly “G” icon. If you don’t see it immediately, click the puzzle piece (Extensions) icon and pin Grammarly to your toolbar for quick access.
Step 7: Sign In or Create an Account
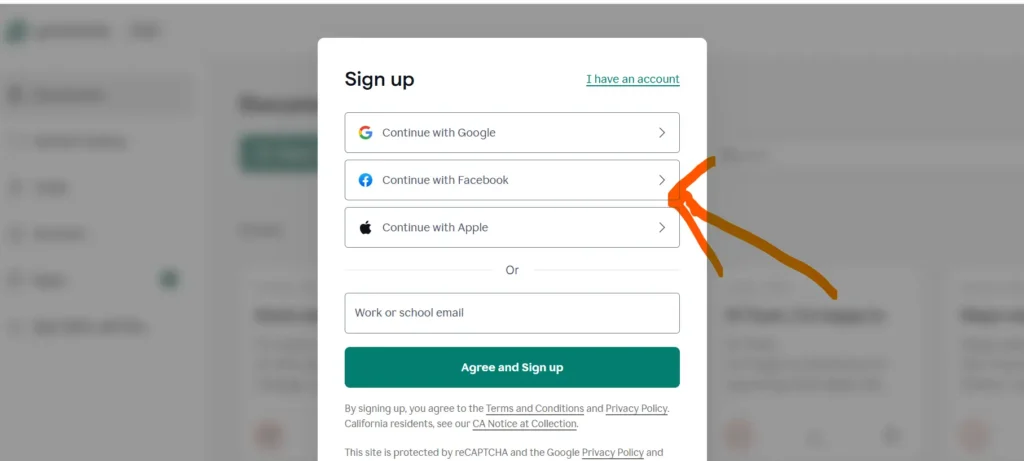
Click the Grammarly icon and either sign in with an existing account or create a new one for free using your email or Google account.
Step 8: Start Writing
That’s it — Grammarly is now active. Open Gmail, Google Docs, or any website with a text box, and you’ll see real-time suggestions as you type.
How to Sign In to the Grammarly Browser Extension
If you already installed the extension but haven’t signed in yet:
- Click the Grammarly icon in your Chrome toolbar.
- Select Sign In.
- Enter your email and password, or continue with Google/Facebook/Apple login.
- Once signed in, your account settings (free or premium) sync automatically across the extension.
How to Check If Grammarly Is Installed Correctly
Not sure if the Grammarly add-on for Chrome is actually active? Here’s how to verify:
- Open any website with a text field (like Gmail or Twitter/X).
- Click inside the text box and start typing a sentence with an obvious spelling mistake.
- If Grammarly is active, a small floating “G” icon will appear near the text box, and errors will be underlined in red or orange.
- You can also check chrome://extensions/ in your address bar — Grammarly should be listed there and toggled “On.”
How to Enable or Disable Grammarly on Specific Websites
Sometimes you don’t want Grammarly running everywhere (like on a coding site or password field). Here’s how to control that:
- Click the Grammarly icon in your toolbar.
- Toggle Grammarly for this site off to disable it on the current page.
- To manage this globally, go to chrome://extensions/, click Details under Grammarly, and adjust Site Access permissions.
How to Check Plagiarism Using Grammarly
Grammarly’s built-in plagiarism checker (available on paid plans) compares your writing against billions of web pages and academic papers.
- Log in to your Grammarly account at app.grammarly.com.
- Open a new document or paste your content into the Grammarly editor.
- Click the Plagiarism tab in the left-hand menu.
- Wait a few seconds while Grammarly scans your content.
- Review the plagiarism percentage and the list of matching sources.
- Revise flagged sections and add proper citations where needed.
Keep in mind: no plagiarism checker is 100% accurate. For important academic or client work, it’s a good idea to cross-check with a second tool alongside Grammarly.
What’s New: Grammarly Go (AI Writing Assistant) in 2026
Grammarly has expanded well beyond grammar checking. Grammarly Go, now integrated into the Chrome extension, can:
- Generate first drafts and outlines from a simple prompt
- Rewrite sentences for tone, clarity, or length
- Summarize long text
- Reply to emails and messages with AI-generated suggestions
This AI assistant is accessible directly from the extension by clicking the lightbulb icon next to the Grammarly logo, without switching tabs or tools.
Grammarly Extension Not Working? Common Fixes
If the Grammarly browser extension stops showing suggestions, try these fixes in order:
- Refresh the page — Grammarly sometimes needs a reload to activate on a tab that was open before installation.
- Check site permissions — go to chrome://extensions/ → Grammarly → Details → make sure “Site Access” is set to allow the site you’re on.
- Disable conflicting extensions — other grammar or autofill tools can clash with Grammarly. Disable them one by one to isolate the issue.
- Update Chrome — an outdated browser version can break extension compatibility.
- Sign out and sign back in — this resyncs your account and often fixes suggestion issues.
- Reinstall the extension — remove it from chrome://extensions/ and add it again from the Chrome Web Store.
- Clear cache — old cached scripts can occasionally block the extension from loading properly.
Grammarly for Chrome vs Firefox vs Safari vs Edge
| Browser | Supported | Notes |
| Chrome | ✅ | Full feature support, most widely used |
| Firefox | ✅ | Same core features as Chrome |
| Safari | ✅ | Extension must be manually enabled per site |
| Microsoft Edge | ✅ | Works via Edge Add-ons store |
| Opera / Brave | ❌ | Not officially supported by Grammarly |
If you switch between devices, your Grammarly account and settings sync across all supported browsers, so you don’t need to reconfigure preferences each time.
Frequently Asked Questions
Yes. “Grammarly add-on for Chrome,” “Grammarly extension,” and “Grammarly browser extension” all refer to the exact same free tool available on the Chrome Web Store. There’s no separate “add-on” product — it’s just different wording people use to search for the same install.
Yes. The free version of the Grammarly extension for Google Chrome covers basic spelling, grammar, and punctuation checks. Advanced features like the plagiarism checker and full-sentence rewrites require a Premium subscription.
You need a free Grammarly account to use the extension. You can sign up in seconds using your email, Google account, or Facebook login during installation.
Click the puzzle-piece (Extensions) icon in Chrome’s toolbar and pin Grammarly manually — Chrome sometimes hides newly installed extensions by default.
Yes. Grammarly works inside Google Docs through the Chrome extension, showing suggestions in the same floating panel it uses on other websites.
Grammarly is lightweight and generally doesn’t cause noticeable slowdowns. If you experience lag, try disabling it on resource-heavy sites where you don’t need grammar checking.
Yes. Grammarly is a Google-verified publisher with no history of policy violations on the Chrome Web Store, and it follows Chrome’s recommended extension security practices.
Go to chrome://extensions/, find Grammarly, and click Remove. This uninstalls the extension without affecting your Grammarly account or saved documents.
Final Thoughts
Learning how to add the Grammarly extension in Chrome takes less than two minutes, and it can noticeably improve the quality of everything you write online — emails, blog posts, social media captions, and more. Start with the free plan to get a feel for it, and upgrade to Premium if you need deeper clarity, tone, and plagiarism checks.
If you’re setting up other productivity or SEO extensions alongside Grammarly, check out our guides on the SEOquake plugin for Chrome and is MozBar safe to use — both are useful additions to a Chrome-based writing and research workflow.